News from SU!
December 21, 2010
As you know, we have been working to resolve quality issues with the Ornament Punch (item 119847) and the 2-3/8" Scallop Circle Punch (item 118874). We want to update you on the status of these punches. Please note that because the quality issues are different for each punch, we have different plans for dealing with each punch.
2-3/8" Scallop Circle Punch
We are currently testing new punch samples from our vendor. We are working as quickly as possible to complete testing. After we have completed testing and have approved modifications to the punch, we will begin production. When we have more information, we will let you know when these punches will be available to order.
Ornament Punch
We are currently inspecting the inventory we have in our warehouse to ensure that the punches we have in stock are working correctly. After we are satisfied with the quality of the inventory we have in stock, punches will be available to order.
We have been asked if the quality problems are due to the new body style and the punch changeover. We want to assure you and your customers that these quality issues are not related to the new body style; instead, individual metal pieces inside the punches are defective. These parts were also part of the old body style, and the defective parts are different for each punch.
We thank you for your patience as we strive to ensure that the products we sell are of the highest quality and value. We will update you on our progress as we work through these issues.

Tuesday, December 21, 2010
December's Stamp Group Projects
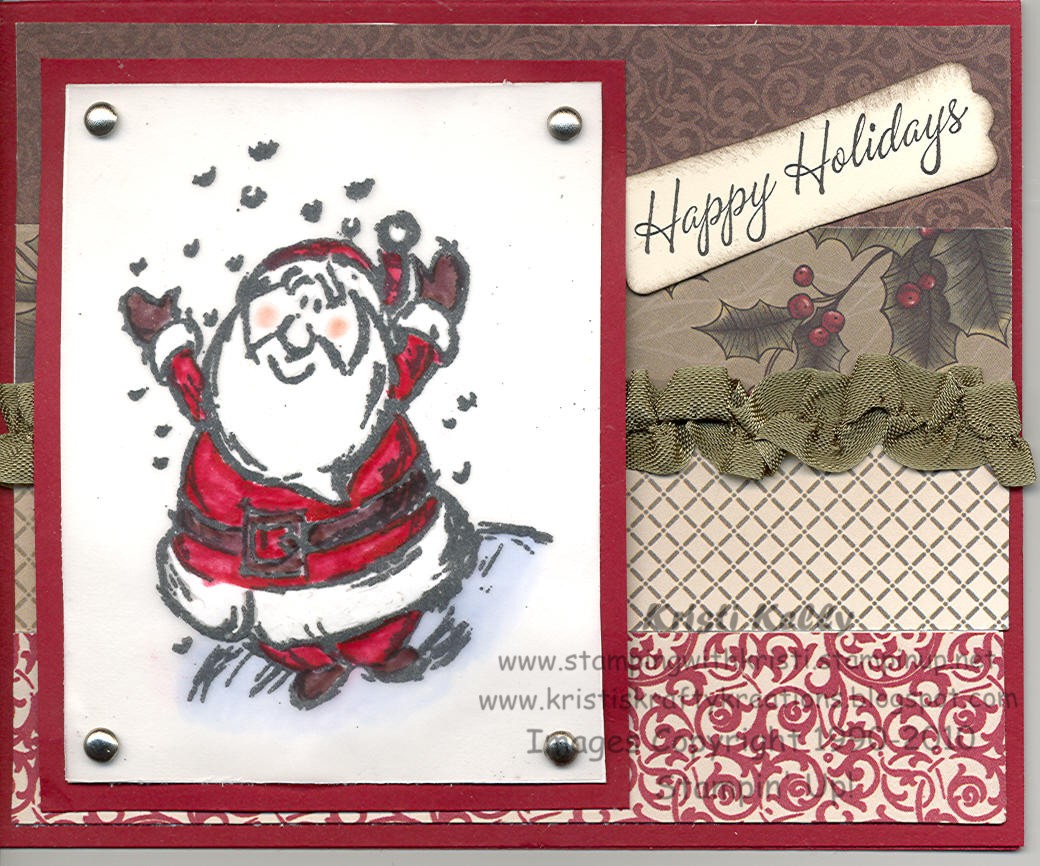
This month for my Stamp Group projects the technique was Faux Stained Glass. It uses Vellum, Versa Mark, Fine Black Embossing Powder, Embossing Buddy, Blender Pen, White Gel Pen, & SU Markers. I had lots of the Deck the Halls DSP left so I used the scraps for the background of the card. I used the Artichoke seam binding & gathered it to add a little more dimension to the card. The base of the card is Cherry Cobbler. The Happy Holidays stamp came from a retired set called Warmest regards. I punched it out with the Modern Label punch & sponged it with Early Espresso. I colored the front of the vellum parts of Santa that should be white with the White Gel Pen and that gave it a lot of pop. It looks way better in person.
The members of my Stamp Group got a Fun item for their Christmas gift. It's a Bone White 6x6 China Heart box that they can decorate. A rub-on, or one of SU's small stencils would work great. I used the 4 pk of heart stencils from SU, and used the Craft Real Red Ink. I put Clear Embossing powder over the top and heat set it. It worked pretty good. I had to be really careful because in a few small spots it got a little over heated and turned the Embossing powder white. I would show you a picture, but due to copywright laws I guess the picture was blocked by the company that makes the Heart Box. So sorry!
Merry Christmas & Happy Holidays!
What a wonderful time of the year. I love to drive down the street and see all the Christmas lights and decorations. When I go to people's homes I love to see how they decorated their trees. It always fun for me to use my SU products to make gifts for my friends and family. Of course it's also fun to receive gifts as well.
As we celebrate this holiday season may we all remember the real reason we celebrate. It's the birth of our Savior, Jesus Christ. I'm so grateful for the birth of my Savior and for the sacrifice that he made that I may be forgiven of my sins. This song song my Celine Dion is one of my favorites and reminds me of the "Reason for the Season." Have a wonderful Holiday!!
As we celebrate this holiday season may we all remember the real reason we celebrate. It's the birth of our Savior, Jesus Christ. I'm so grateful for the birth of my Savior and for the sacrifice that he made that I may be forgiven of my sins. This song song my Celine Dion is one of my favorites and reminds me of the "Reason for the Season." Have a wonderful Holiday!!
Monday, November 29, 2010
MY HOLIDAY 9X9 FOLDING ALBUM ALL PUT TOGETHER
I got my finished pages that I'd been working on glued to my 9x9 folding album. This is one side of the album. It's hard to see all the glitter and detail on the pages.


The Watercolored Crayons are available starting right now !
Hi Stampers :
The wait is over :) YAHOO!!
The Watercolored Crayons are available starting right now !
Thank you for your Patience.
Use the following item numbers to purchase your Watercolor Wonder Crayons:
•120949 New Color Kit
•119802 Subtles
•119803 Regals
•119804 Brights
•119805 Neutrals
The wait is over :) YAHOO!!
The Watercolored Crayons are available starting right now !
Thank you for your Patience.
Use the following item numbers to purchase your Watercolor Wonder Crayons:
•120949 New Color Kit
•119802 Subtles
•119803 Regals
•119804 Brights
•119805 Neutrals
Sunday, November 21, 2010
HOLIDAY 9X9 FOLDING ALBUM! PAGE 8
This is page 8 of the album:

This page took forever to come up with! I was trying to stick with only using one package of DSP & I only had two full sheets left. They both had patterns that I needed to use on the other pages. This is where I said... I have a bunch of 3 x 9 scraps that I can use, so I didn't stick with the scrap mat that I was given by my new Demo friend Tami Black. I knew that I wanted to use the Artichoke seam binding ribbon & some more of the Designer Big Buttons. I used the gathering trick with the seam binding. You take a few strands from the middle of the seam binding and start pulling them while holding the rest in your other hand. It will start to gather. I just moved the gathering down as it got more bunched up. If you move it down too far it will un-gather so you have to be careful.
I sponged the edges of the Cherry Cobbler card stock, & tab, & the Vanilla mat. I adhered the Cherry tab to the Vanilla mat. Next adhere the Poinsettia piece of DSP to the right side of the 9x9 Vanilla card stock. Next, take your 2-way glue pen and trace the W in WISH, then add the Champagne glitter glass. Do the same to each letter. Add adhesive to the Wish DSP on the left side, left half top, bottom, right side. Leave a slot for the Vanilla mat to go into. Adhere the Cherry Cobbler mat as shown. Put the Seam binding on with Sticky Strip or another strong adhesive. Put hemp through the button as shown and adhere with glue dots or a dimensional. This page can be sprayed or not with Shimmer mist.
I hope that you enjoyed these pages. If so, please post a comment. Once I have the pages put into the folding album I will make another post.
A big thanks goes out to Tami Black for the album idea and help in getting the folding ablums!
Another big thanks goes to Mitz for helping me cut all the card stock!
I couldn't have done this class without your help.
HOLIDAY 9X9 FOLDING ALBUM! PAGE 7
This is page 7 of the album:

Start with sponging all your regular card stock pieces with Soft Suede ink. I did the Peace & Love on the Big Shot. I used the Decorative Peace & Cheer word strip. I only used those words on the die cut strip. I put the Vanilla card stock on the Sizzix adhesive 12x12 paper and cut them them at 2"x 4" for the Peace &, then I cut 2 3/4" x 1"3/4" for the Love. I cut one where I laid the adhesive side down on the die cut and that gave me the sticky side facing on the top of the words. I pealed the paper off & then put SU fine gold glitter on the words. The next time I ran the card stock through the Big Shot I put the adhesive side facing up. This left the adhesive side on the back of the word. I sponged a little Soft Suede ink on the Peace, &, love and adhered them to the Cherry Cobbler DSP. I then put 2 way glue on the glittered Peace, &, and love, and adhered them on top of the other ones slightly above the other ones giving it a mirrored affect. Wrap the Cherry Cobbler Seam binding around the edges of the Soft Suede card stock and adhere at the back. Put dimensionals on all four corners. Adhere the Soft Suede patterned DSP at the top, next the Crumb Cake strip. Put adhesive on the 3 edges of the Cherry Cobbler DSP, and some to half of the right side, leaving a slot open for the Vanilla mat to go into. Adhere the Cherry tab onto the small Vanilla mat and put it into the Cherry Cobbler DSP slot. Adhere the Soft Suede piece to the DSP. I didn't use the Shimmer Mist on this page since it had enough sparkle.
HOLIDAY 9X9 FOLDING ALBUM! PAGE 6
This is page 6 of the album:

Start with sponging the Vanilla card stock, the red envelope, & the edges of the Cherry Cobbler card stock with Soft Suede. The little envelope was made with the Petal card punch. Adhere the brown corner pieces to the larger Vanilla mat & add one dimensional to the back of each corner. Adhere the smaller DSP with mistletoe to the top of the 9x9 card stock, followed by the Cherry Cobbler strip. Adhere the brown DSP to the bottom of the page. Put the Victoria lace ribbon across the middle to hide the seam. Adhere the ends around the back. Poke one hole in each flap of the Cherry envelope with a paper piercer. Put the safety pin through the holes and close it. This is a little tricky. If you bend the envelope slightly it will help you close the safety pin. Put a glue dot or a small dot of glue under the flaps of the envelope so they stay down. This little safety pin comes in the SU Vintage Trinkets. Adhere the envelope to the DSP as well as the Vanilla mats as shown. You can Shimmer mist this page as well.
HOLIDAY 9X9 FOLDING ALBUM! PAGE 5
This is page 5 of the album:

HOLIDAY 9X9 FOLDING ALBUM! PAGE 4
This is page 4 of the album:

You'll start by sponging all you pieces with Soft Suede ink. Tie a knot in the Early Espresso ribbon & adhere the ends to the back of the Vanilla card stock. Adhere the Soft Suede piece to the 9x9 Vanilla card stock. Place the DSP squares & the Vanilla square on the Soft Suede card stock as shown. No dimensionals are used on this page.
HOLIDAY 9X9 FOLDING ALBUM! PAGE 3
This is page 3 of the album:
This page was a quick page. Adhere the Mistletoe DSP to the left side of the 9x9 Very Vanilla card stock. Adhere the Soft Suede card stock to the very right edge of the 9x9 Very Vanilla card stock.
Sponge all the Vanilla & Soft Suede card stock. Put the Real Red eyelets in the Vanilla card stock. Adhere the Mistletoe tab onto the small Vanilla mat. Put a dimensional on each corner of the Vanilla mat without the eyelets. Put a thin line of adhesive at the bottom of that Vanilla mat & adhere it to the Soft Suede card stock about 1/8" from the bottom . Adhere the other Vanilla piece with the eyelets to the top leaving about 1/8" from the bottom. Put your small Vanilla mat into the slot on the bottom.

The pull out can be used for journaling or for another picture. You can fit 2 to 3 pictures on this page.
HOLIDAY 9x9 FOLDING ALBUM- PAGE 2
Page 2 was fun to do. It also has a pull out using the new Cherry Cobbler ribbon binding & a small button brad from the SU Vintage Trinkets. Always Artichoke was used for the mat & Cherry Cobbler Textured for the center card stock piece. I just love the Deck the Halls DSP! The corner edges were punched out of some scraps from the brown sides of one of the DSP pages. It's hard to tell on this picture, but all the centers of the pointsetta's have pearls. This page also uses the Champagne Shimmer Paint & alcohol mixture. It gives it that little sparkle to finish it off.

For those of you that are putting your kit together, pop up the Vanilla mat with dimensionals.
Put a small line of glue at the bottom of the vanilla mat so that the Artichoke mat doesn't fall through. Put your pearls on your poinsettas. Shimmer Mist your page if you'd like. HOLIDAY 9X9 FOLDING ALBUM FINISHED! PAGE 1 OF THE ALBUM
I can't believe that my Holiday 9x9 Folding Album class is finally done and I have all 8 pages photographed. I had 5 ladies come over to make the album. We went page by page together. It took us 5 hours to complete the 8 pages. We had a short break in between. This was a big project to undertake. It was well worth it after seeing all the pages completed in the album. I also had 3 people order kits. I'm sure that these photo's won't do the pages justice.
This is page 1-There is a pull out for an extra photo or journaling. For those that are doing the kit, the top Soft Suede smooth sheet goes on the top, the textured piece is on the bottom. The DSP goes in the middle. Hold the two Soft Suede pieces of card stock together and adhere the DSP on top of the Soft Suede. Make sure to center it. Put a rhinestone in the middle of the red star burst if one isn't there for you already. Put a dimensional on the back of each ornament (Delightfully Decorations set). Tape the Gold cord on the top part of the ornament & make sure the Gold cord will fold over the top of the Soft Suede card stock. Adhere the ornament to the DSP where it should be and fold the Gold cord over the top & tape it. Do that with the other two ornaments. Put adhesive on the three sides of the Cobbler card stock, leaving one side open for the vanilla mat to pull in and out. *Make sure that the Soft Suede tab doesn't hang over the DSP. Edge everything with a sponge except the ornaments in Early Espresso or Soft Suede ink. Then spray with the Champagne Shimmer Mist solution.

This is page 1-There is a pull out for an extra photo or journaling. For those that are doing the kit, the top Soft Suede smooth sheet goes on the top, the textured piece is on the bottom. The DSP goes in the middle. Hold the two Soft Suede pieces of card stock together and adhere the DSP on top of the Soft Suede. Make sure to center it. Put a rhinestone in the middle of the red star burst if one isn't there for you already. Put a dimensional on the back of each ornament (Delightfully Decorations set). Tape the Gold cord on the top part of the ornament & make sure the Gold cord will fold over the top of the Soft Suede card stock. Adhere the ornament to the DSP where it should be and fold the Gold cord over the top & tape it. Do that with the other two ornaments. Put adhesive on the three sides of the Cobbler card stock, leaving one side open for the vanilla mat to pull in and out. *Make sure that the Soft Suede tab doesn't hang over the DSP. Edge everything with a sponge except the ornaments in Early Espresso or Soft Suede ink. Then spray with the Champagne Shimmer Mist solution.

The next post will contain page 2
Monday, November 8, 2010
HOLIDAY 9X9 FOLDING ALBUM
Come make this beautiful Holiday 9x9 Folding Album with me.
DATE: Saturday, November 20, 2010
TIME: 10:00 a.m. - 1:00 p.m.
PLACE: Kristi Kelly's House
(email me for address)
COST: $25 due when you sign up via check or cash
RSVP: by Monday, November 15th
This is what you've all been waiting for! It's the first page of 8 PAGES of the Holiday 9x9 Folding Album. This is just a sneak peek for now until I have it all done.
It's so much prettier in person! I used the Deck the Halls Designer Paper. Delightful Decorations stamp set for the ornaments. I sprayed the whole page with Champagne Shimmer Mist and it's so sparkly! The Vanilla card stock pulls out where the Early Espresso tab is. You can use this for an extra picture or journaling.
DATE: Saturday, November 20, 2010
TIME: 10:00 a.m. - 1:00 p.m.
PLACE: Kristi Kelly's House
(email me for address)
COST: $25 due when you sign up via check or cash
RSVP: by Monday, November 15th
This is what you've all been waiting for! It's the first page of 8 PAGES of the Holiday 9x9 Folding Album. This is just a sneak peek for now until I have it all done.
It's so much prettier in person! I used the Deck the Halls Designer Paper. Delightful Decorations stamp set for the ornaments. I sprayed the whole page with Champagne Shimmer Mist and it's so sparkly! The Vanilla card stock pulls out where the Early Espresso tab is. You can use this for an extra picture or journaling. Hope to see you at this class! You won't want to miss this great gift giving album.
NOVEMBER TECHNIQUE STAMP GROUP
This card is one of the new techniques out there. I found it on Glenda Calkins blogh. I belive it was taught at one of the Stampin' Up Regionals. Basically, I ran the snowflakes through the Big Shot with my Northern Frost Die cut, pasted them on my Marina Mist card stock. I then put that into my Square Lattice Embossing Folder and ran that through my Big Shot. It's called Inlaid Embossing. It looks so cool! I did change up the brad & add the Champagne Shimmer mist, but for the most part it's the same.Thanks Glenda for your great card design!
 We also did another really cute card which I'll post when I have a minute to take a picture of it.

OCTOBER TECHNIQUE STAMP GROUP PROJECTS
This is the Technique that I taught at my Technique Stamp Group in October . It was called Faux Film Strip. This is not the best picture of this card, but you get the idea. I used the Polka Dot Embossing Folder on the White background of the card. I did the Happy Holidays tag by putting the tip in through the top of the Designer Label XL Punch. Then did the other tip of the tag the same way. The Spiral Border Punch was used to make the film strip look. I used A Cute Christmas stamp set to do the cute pictures. This is a fairly quick card to make. The squares are popped up with dimensionals.

This is a card that we made at Regionals in St. George, UT. I loved this card so much that I knew my Stamp Group would too. I changed the background color of the card stock that the white squares are sitting on and the leaf to Crumb Cake. It still looks great!
Wednesday, November 3, 2010
Update on Watercolor Crayons from Stampin' Up!
Watercolor Wonder Update
November 3, 2010
Our supplier has notified us that we will soon receive our Watercolor Wonder Crayons, and we are pleased to announce that we plan to have these available for order by the end of November. We will keep you updated if we are notified of any changes to this schedule, and we sincerely appreciate your patience as we work to resolve this product availability issue.
Monday, November 1, 2010
French Foliage Card Kit
 I finally had a minute to edit my pictures and put the watermarks on, etc. The French Foliage Card kit was designed by Lynn Pratt. This card kit was my October Stamp Camp. The kits were very successful. I'm posting some close ups of the cards that I made so if you still need to put yours together you can look at these pictures.
The Leaf is popped up in this card. You will tie a knot on pne side of the Hemp and gauge where the other knot needs to be tied. I did this by laying down my saying & tying the knot close to the saying and adjusting the knot so that it looked even with the knot on the other side. The ends of the hemp go underneath the Mustard c/s.
This card is on it's side. I saved it right side up, but blogger wouldn't let me rotate it. Sorry!

This card is on it's side. I saved it right side up, but blogger wouldn't let me rotate it. Sorry!

When you do the box make sure you glue only the bottom tabs to the outside of the box.


The top of the box isn't shown. It attaches to the bottom of the box by the long flap at the bottom. The two sides will attach to the outsides of each side of the box. Glue them one at a time. The small tab with fit through the long slit. You can close your box with removeable adhesive, velcro or leave it open.
Here's a picture of all the cards together. 
I hope that you all enjoy your card kits. They look so beautiful in person!
Keep an eye out for a peek of the Holiday 9x9 folding album class which will be November 20th 10 am- 1 pm
You won't want to miss this one!!
Birthday Gift Container Dressed up
I saw this cute little container filled with carmels at Wal-Mart. My boss at work was having a birthday and I wanted to dress this container up to give it to her. So I took the sticker off the front and used some old SU Designer Paper from a few mini catalogs ago. I believe it was a Valentine designer package. It has a bunch of sparkles on it. I used the Big Shot Circles #2 die to cut the designer paper out. Then I used the small Scallop Punch on Whisper White C/S & did some Chocolate Chip around the edges of it. I used the Single stamp called Sweet Birthday in the front of the Big Catalog and colored it with Regal Rose & the candle with Daffidol with my SU markers & and Blender Pen. I popped up the scallop with dimensionals. I used the Happy Bithday saying from the Sweet Birthday stamp which I cut off with my scissors and mounted on the side of the wood. I cut that out with the Word Window Punch and took my sponge and did some Chocolate Chip around the edges of it and popped that up as well. It really turned out cute! The picture didn't turn out so cute. I took these pictures with my cell phone and it was pretty dark. 


Tuesday, October 19, 2010
Winner of Owl Contest!
I only had one person participate in naming my Owl which was Kimberly Lynch. She picked the name Owlivia. She will receive one of my Halloween owls. See my September post to see a picture of Owlivia.
Thanks Kimberly for playing!
Thanks Kimberly for playing!
Thursday, September 30, 2010
Important Product Information
September 29, 2010
Please note the following product updates:
The Candy Cane Rub-Ons (item 120990) are now available to order.
The following items are experiencing quality issues and are currently unavailable to order:
118073: Fancy Flower Punch
120906: 2-1/2" Circle Punch
I'll give you more information when it becomes available.
Kristi
Tuesday, September 21, 2010
Start Preparing for Your Holiday Projects Now!
September 20, 2010
It's hard to believe, but the holidays are right around the corner--and we want to make your holidays more special than ever! The ABCs of the Perfect Handmade Holiday will help you prepare for the holidays without all the stress. From October 19-December 16, 2010, we'll be offering you and your customers holiday bundles perfect for creating Amazing cards, Beautiful packaging, and Cherished gifts--all at 20 percent off!
Stamp Set Bundles
Vintage Christmas Card Bundle
•Bells & Boughs Set
•Deck the Halls Designer Series Paper
124067 Wood Mounted Bundle Item#
$23.92 Wood Mounted Bundle Sale Price
124068 Clear Mounted Bundle Item#
$19.92 Clear Mounted Bundle
Contempo Christmas Card Bundle
•Contempo Christmas Set
•Jolly Holiday Designer Series Paper
124071 Wood Mounted Bundle Item#
$20.72 Wood Mounted Price
124072 Clear Mounted Bundle Item#
$17.52 Clear Mounted Bundle Price
Tags til Christmas Bundle
•Tags til Christmas Set
•Decorative Label Punch
124077 Wood Mounted Bundle Item#
$38.32 Wood Mounted Bundle Price
124078 Clear Mounted Bundle Item#
$31.92 Clear Mounted Bundle Price
Gift Packaging Bundle
•Gifted Set
•Mini Lunch Sacks
124083 Wood Mounted Bundle Item#
$26.32 Wood Mounted Bundle Price
124084 Clear Mounted Bundle Item#
$19.92 Clear Mounted Bundle Price
Simply Adorned Gift Bundle
•Charming Set
•Simply Adorned 1" x 1-1/4" Charm
•Simply Adorned 24" Chain
124076
$39.88
Non-Stamp Set Bundle
Frame Gift Bundle
•Definitely Decorative Chunky Frame
•Small Chocolate Chip Dotted Flourish Décor Elements
124075
$19.92
Email me to order your bundles now or order on-line at www.stampinwithkristi.stampinup.net
Thanks!
Kristi
Thursday, September 16, 2010
SEPTEMBER HALLOWEEN STAMP CAMP!!
Are you ready to make some cute Halloween projects? I like to get an early start so I have time to make up some cute things for my friends at work & my youngest child's classmates.
Here's the details:
DATE: Saturday, September 25th
TIME: 10am-12pm
PLACE: Kristi Kelly's house
North Las Vegas, NV 89084 (email for address)
COST: $10
RSVP: Monday, September 20th
 Here's my Holiday M&M Owl. He's a disco dancer! You can make his wings move and he can be whatever you want him to be.
Here's the details:
DATE: Saturday, September 25th
TIME: 10am-12pm
PLACE: Kristi Kelly's house
North Las Vegas, NV 89084 (email for address)
COST: $10
RSVP: Monday, September 20th
We'll be making 3 projects that are quick and easy and way cute!
 Here's my Holiday M&M Owl. He's a disco dancer! You can make his wings move and he can be whatever you want him to be.
 I'd like to give my owl a name. Please leave me a comment and help name him. Me and my kids will decide which name we like the best and the winner will get an owl!!
(Must be in the US, Sorry.)
Here's my Burgundy owl with his friend the retired Orange owl. They're both having so much fun hangin' out with their M&M dude. I know you just have to make one!! :) 

Here's the next project we're doing which is a card using the Sweet Centers stamp set. I finally took my Tasteful Trim Die out of the Plastic and used it for the Wicked Specialty DSP along the side. Love the Spider embossing folder on the Rich Razzleberry c/s. I punched a circle from the 1 3/4" punch and then cut it out again with the next size circle punch to put on the outside of the card. The base of the card is Old Olive. When you open the card you see the EEK circle inside. This card was originally done by Dawn Griffith.

The last project is one of my favorite new dies or the Big Shot. It's the Candy Wrapper die.
I sprayed this with this with the Vanilla Smooth Spray to give it some sparkle. The spider is from a retired stamp set, but I can't get rid of it. I punched out the spider with a 1 1/4" circle punch & the Black mat was done with the 1 3/8" circle punch. The Rich Razzleberry paper is the Wicked Specialty DSP that I put through the Spider Web embossing folder. This die can also be made into a box by folding the ends a different way. It will hold a mini candy bar or maybe two depending if they're thin or thick ones. It's a must have in my book!!

September Technique Stamp Group Projects
This month for Technique Stamp Group we did some fun projects. The Island Floral flower was a tutorial that was done by Cristena Bagne. I just loved this flower and wanted to do a card with it. I designed the card & the colors for the flower. I used So Saffron, & Old Olive for the flower. Chocolate Chip w/the Circle #2 die, (lrg. circle) for the Big Shot. I used some retired Old Olive ribbon. I Scallop Edge Border punched the Chocolate Chip c/s, then took a paper piercer & poked a hole in each scallop, and put them under the Play Date DSP. Some sponging was done to the bottom edges of the card, & the scallop circle with Early Espresso ink. The leaves were sponged with Old Olive & the flower with So Saffron ink. This will be sure to get some oohs and aahs from your customers! I can see these on the tables at a wedding reception, party, or on top of a nice gift box.
What are some of your ideas of what you'd do with this flower idea??

I bought the stamp set Wicked Cool since I've seen so many neat things made with it. I saw a card that I thought was really cute and thought I'd CASE some of it. I don't remember now where I saw it, so if you know, please leave a comment. Or you can leave a comment if you like what you've seen so far.

The colors I used were, Rich Razzleberry for the card base, Old Olive in the Spider Web embossing folder, Wicked Cool DSP, Black c/s, White c/s, & the Bat Punch w/White gel pen for his eyes. I sponged the White c/s & the Old Olive c/s around the edges with Rich Razzleberry ink. I also used the Rich Razzleberry marker on the witches hat. I used dimensionals to pop up the hat, bat, & the stamped image. Do you see the sparkle on the Old Olive c/s? Take a really close look. It was sprayed with the Vanilla Smooth spray. It was the perfect finishing touch.
Pizza Box Pre-Convention Project
This is one of the projects that we made at the Pre-Convention event that the LVStampers held in July in Salt Lake City, UT. This was the project that was done by Keven T & his group. I just love it! It actually will fit one of those mini gummi pizza's in it.
 I have incentives for my team members and this is the kit that my team member Laura won for last month. If you'd like to be on my team you can come to Convention with me this July in Salt Lake City, UT. You can join by going to my Stampin' Up website or email me. I would love for you to join me!!
Saturday, August 28, 2010
New Clearance Rack Items!!
Holy Clearance Rack!!!!
New items have been added to the Clearance Rack Place your orders ASAP before the items sell out. Click HERE to go to my website then click "Shop Now" and Clearance Rack to view the items and to order.
Here are a few of the items:
Card stock in the following colors from $2.49-$2.99 per pack (8 1/2 x 11 unless other wise listed)
Almost Amethyst
Basic Black
Bordering Blue
Brilliant Blue
Brocade blue
Cameo Coral
Creamy Caramel
Green Galore
Mellow Moss
Lavender Lace
Only Orange 12x12
Pale Plum
Pixie Pink
Pink Passion
Really Rust
Summer Sun
Taken with Teal 12x12
Yo Yo Yellow
Sending Love Designer Series Paper-$4.99
Real Red, Pretty in Pink, Chocolate Chip Epoxy Brads $1.49-$1.99
Snowflake Shimmer Decor Decals for your walls and windows $5.99
Silver and gold elastic Cord $1.99 ea
I Wish Simply Scrappin' Kit $7.99
On Board Scallop and Bird Books $1.99 ea
Thanks so much!
Kristi
Sunday, August 22, 2010
August Technique Stamp Group Projects
This month's Stamp Group was at Desiree's house. She invited 4 of her good friends to come. One of them I haven't seen in years. It was so good to visit with her for a little bit.
I taught the "Thumping Technique" or a version of it. I used the Just Believe stamp set, which I love! See how the leaves have a darker ink on them. This is the "Thumping Technique". There's also some sponging with some of the new colors. The ribbon wave was done with the new Rich Razzleberry Taffeta ribbon.
 The inside bottom of the card has a strip of Razzleberry that uses the White Frost Shimmer Paint and the stamp to give it a pretty sparkly effect. I designed this card and am happy to say that I think it turned out really nice. If you'd like any further information about it, please leave me a comment. Thanks!


I taught the "Thumping Technique" or a version of it. I used the Just Believe stamp set, which I love! See how the leaves have a darker ink on them. This is the "Thumping Technique". There's also some sponging with some of the new colors. The ribbon wave was done with the new Rich Razzleberry Taffeta ribbon.


Now for the 2nd card that we did that evening. It took us a while to get through both of these projects. We had 10 ladies come and we were laughing and having so much fun it was hard to stay on task. It was also time consuming since I only had one stamp set. I love this card! I saw a version of it on Angela Walford's Blog. I changed it up a little. I added White Gel Pen to the Scallop Border punch. I used Play Date DSP instead of the Poppy DSP. She used two buttons & I used a bitty button with c/s behind it & a thin piece of Daffodil Delight c/s through the button. Add a little twist at the end to get your tails & put on with a glue dot. I used the BoHo Blossom Punch for the other flower w/a black brad. The base card is Crumb Cake put through the SU Perfect Polka Dots Embossing folder. The sick chick was colored with Daffodil marker & blender pen. The flower was done with Real Red the same way.

If you'd like to join our Technique Stamp Group we're starting the next round on September 10th. Post a comment and I'll get back to you.
Thanks, Kristi
NEW My Digital Studio Downloads!
NEW My Digital Studio Downloads
Stampin' Up! will continue to offer additional downloads for the My Digital Studio Paper Crafting solution as they create new papers, embellishments and stamp brush sets. I will post the pictures of the downloads with the item numbers and prices to make your ordering easier.
The digital downloads must be ordered online through my website http://www.stampinwithkristi.stampinup.net/ and they are available for immediate download to your computer after the transaction is complete.
You can see all the additional downloads available for purchase when you go to my website and click on Shop Now under Digital Crafting.
Stampin' Up! has released four NEW Digital Downloads for My Digital Studio. Please note that you do not have to have My Digital Studio to purchase these downloads, they will work in other applications.
123367 Flower Brads Brights Pack $1.95 click Here
123374 Flower Brads Subtles Pack $1.95 click Here
123381 Flower Brads Regals Pack $1.95 click Here
123388 Flower Brads Neutrals Pack $1.95 click Here
121440 Letters stamp brush set $9.95 click Here
121439 Forest Friends stamp brush set $1.95 click Here
123431 Funky Four stamp brush set $3.95 click Here
123433 Play Date Embellishments $5.95 click Here
123432 Play Date Quick Accents Kit $5.95 click Here
Stampin' Up! will continue to offer additional downloads for the My Digital Studio Paper Crafting solution as they create new papers, embellishments and stamp brush sets. I will post the pictures of the downloads with the item numbers and prices to make your ordering easier.
The digital downloads must be ordered online through my website http://www.stampinwithkristi.stampinup.net/ and they are available for immediate download to your computer after the transaction is complete.
You can see all the additional downloads available for purchase when you go to my website and click on Shop Now under Digital Crafting.
Stampin' Up! has released four NEW Digital Downloads for My Digital Studio. Please note that you do not have to have My Digital Studio to purchase these downloads, they will work in other applications.
123374 Flower Brads Subtles Pack $1.95 click Here
123381 Flower Brads Regals Pack $1.95 click Here
123388 Flower Brads Neutrals Pack $1.95 click Here
121440 Letters stamp brush set $9.95 click Here
121439 Forest Friends stamp brush set $1.95 click Here
123431 Funky Four stamp brush set $3.95 click Here
123433 Play Date Embellishments $5.95 click Here
123432 Play Date Quick Accents Kit $5.95 click Here
121438 Play Date Designer Series Paper $4.95 click Here
These are so fun to play with. Give them a try today!
Kristi Kelly
Tuesday, August 10, 2010
PICNIC BASKET STAMP CAMP
Come make this beautiful Summer Picnic Basket with me!

Here are the details:

PLACE: Kristi Kelly's house
Email for address and gate code
DATE: Saturday, August 21st
TIME: 10 a.m.-1 p.m. or earlier if we get done
COST: $12 ($2 of this fee will go to the RMHouse to help them buy a Big Shot.)
***Please bring your own adhesive (sticky strip is recommended), & scissors***
I have 2 kits left. If there are at least 8 more people that would like to buy or sign up for this kit I'll make some more of them.
Please RSVP by Monday, August 16th by 10 p.m.
Once you've paid for your kit there are no refunds.
Thanks and hope to see you soon!
Kristi Kelly
Fun Simple Punch Art Projects
Want a cute quick handout for a party, a friendly gift, or just for fun. Here's a Punch Frog, Lion, Red Dog, & a Snowman using gum for their bodies. I got this from Judy Robello as one of my swaps from Convention. What a great idea!


Saturday, July 31, 2010
TECHNIQUE STAMP GROUP PROJECTS!
These are the projects that we did last night at my Technique Stamp Group. If you're interested in learning how to do some great techniques to use in your scrapbooking and paper crafting, please email me before the end of August. I'll be starting my next group in September. I have 3 or 4 openings right now. If you are in my group and you couldn't make it, please email me and I will give you some hints on how to color this card. We had some difficulties last night trying to figure out how to make it look like mine. The colors I used were Eggplant & Marina Mist. Vintage Wallpaper Embossing Folder was used for the backgroud. Scallop Trim Border Punch for the bottom of the Eggplant c/s.

 This was a fun card to make! The background uses the Baroque Motif set. The Sizzix Top Note Die was used with the Vintage Wallpaper Embossing folder. Old Olive c/s is behind the Vanilla. The saying is from the new Level 2 Hostess set Apple Blossoms. The Panies tutorial will be on your 6x6 technique sheet that you get for being part of the group. If you didn't receive one, please remind me the next time you see me. The vintage look is very popular right now. I hope you love it cuz I'll be trying more of those kinds of card styles.

 This was a fun card to make! The background uses the Baroque Motif set. The Sizzix Top Note Die was used with the Vintage Wallpaper Embossing folder. Old Olive c/s is behind the Vanilla. The saying is from the new Level 2 Hostess set Apple Blossoms. The Panies tutorial will be on your 6x6 technique sheet that you get for being part of the group. If you didn't receive one, please remind me the next time you see me. The vintage look is very popular right now. I hope you love it cuz I'll be trying more of those kinds of card styles.
 More Pre-Convention & Convention fun!
This is the cute hip water proof purse that held the new catalog, Holiday Mini catalog, Convention agenda, Convention pin for our lanyard, a nice pen with the Convention logo on it, our free stamps sets & Stampin' around wheel. It also has a nice size pink metal key chain hanging from the side of the strap that says Stampin' Up!. It has lots of pockets inside and a nice pocket on the outside for my cell phone. There is also a big pocket on the back side with velcro in the middle. I received so many compliments on it since I've gotten back. Way to go SU!!


From right to left, Mom (that's what we all call her.) Shannon, Tami, & Nikki. Mom is Shannon & Nikki's mom. Penny's off in the background.
 These are some other very talented ladies. That were at our Pre-Convention events as Instructors. CaroleAnn, Lee, & Sandi. So glad I got to meet these ladies.
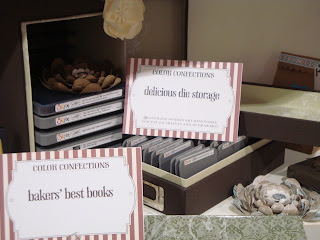
 At Convention they had a Confectioners display. It was like walking into a candy store. I wanted to eat everything!! :) Of course I couldn't because everything was made out of paper, & embellishments from our catalog. It was a sight to see. These pictures just don't do it justice.
 Have some cookie bags with the new cute Owl Punch. & the glitter brads just to the left of them.
 These cupcakes look so yummy! The tree to the left is made out of buttons.
 These are Stampin' Spots wrapped up like candy.
 These cupcakes were one of my favorites cuz of all the bling on them. If you look closely you can see the new jewels for the Simply Adorned line on the top.
 These little chocolates have the Simply Adorned items as well. The colorful chocolates are the ribbon rolled up to look like rossettes. It's making me hungry!! :)
 These are going to be the HOT item for Christmas this year. They are decoratable recordable Christmas cards. They have their own Christmas song or you can record your own message to your loved one. They'll be in the Holiday Mini. Can't wait!!
 This is the new line of quality fabric quarters that you can get in the Holiday Mini. They go a long way for crafting. Great for use in the Big Shot or not! I'm hoping to have some tutorials on my blog shortly for how to make some flowers using this new fabric. These little gift bags on the right were done up quickly on a sewing machine using the new Big Shot Die cut in the Holiday Mini. I can't think of the name off hand.
 These darling mini decoratable houses are also in the Holiday Mini. They come with directions on how to put them together. Wouldn't that look so cute as a decoration in your home or to give as a gift? The little candies in the dish are buttons wrapped up.
 At your child's or friends' B-Day wouldn't it be fun to hand this to them as they walked out the door to thank them for coming. Chocolate is always a nice way to say thanks! Or you could always put in jerky for those that can't have chocolate.
 Here are the much waited for Sizzix Die boxes. I can't wait to get mine so I can start to get organzied! They are very sturdy. The inside of the lids are so pretty! These are a must have if you own Sizzix dies!! I hope that you enjoyed the tour of my fun time at Convention. If you'd like to join me at Convention next year in July, I'd love to have you on my team! Send me an email so I can get you some more information. Stampin' Hugs! Kristi

Here are my roomates Fran, Penny & of course me. Those are real wood blocks. The theme this year was Share What you Love.


From right to left, Mom (that's what we all call her.) Shannon, Tami, & Nikki. Mom is Shannon & Nikki's mom. Penny's off in the background.
 These are some other very talented ladies. That were at our Pre-Convention events as Instructors. CaroleAnn, Lee, & Sandi. So glad I got to meet these ladies.
On Friday evening we went out to dinner at Little
America. It was a nice place. I won a nice stamp for recruiting and a big vellum rub-on for being I think it was #3 or #4 in sales in our Stitchedstamper group. Our group was once 70 ladies. I'm sure it has grown since then. loni is my manager on the left, Sue, Penny (joined our group for dinner), Murlynn, Pam, & me.
 At Convention they had a Confectioners display. It was like walking into a candy store. I wanted to eat everything!! :) Of course I couldn't because everything was made out of paper, & embellishments from our catalog. It was a sight to see. These pictures just don't do it justice.
 Have some cookie bags with the new cute Owl Punch. & the glitter brads just to the left of them.
 These cupcakes look so yummy! The tree to the left is made out of buttons.
 These are Stampin' Spots wrapped up like candy.
 These cupcakes were one of my favorites cuz of all the bling on them. If you look closely you can see the new jewels for the Simply Adorned line on the top.
 These little chocolates have the Simply Adorned items as well. The colorful chocolates are the ribbon rolled up to look like rossettes. It's making me hungry!! :)
Look at all this glass glitter and pretty flower brads, etc.
 Here's the chocolate brads, & paper, etc.

 Here's the chocolate brads, & paper, etc.
I had to through in some cute card samples.
 These are going to be the HOT item for Christmas this year. They are decoratable recordable Christmas cards. They have their own Christmas song or you can record your own message to your loved one. They'll be in the Holiday Mini. Can't wait!!
 This is the new line of quality fabric quarters that you can get in the Holiday Mini. They go a long way for crafting. Great for use in the Big Shot or not! I'm hoping to have some tutorials on my blog shortly for how to make some flowers using this new fabric. These little gift bags on the right were done up quickly on a sewing machine using the new Big Shot Die cut in the Holiday Mini. I can't think of the name off hand.
 These darling mini decoratable houses are also in the Holiday Mini. They come with directions on how to put them together. Wouldn't that look so cute as a decoration in your home or to give as a gift? The little candies in the dish are buttons wrapped up.
 At your child's or friends' B-Day wouldn't it be fun to hand this to them as they walked out the door to thank them for coming. Chocolate is always a nice way to say thanks! Or you could always put in jerky for those that can't have chocolate.
 Here are the much waited for Sizzix Die boxes. I can't wait to get mine so I can start to get organzied! They are very sturdy. The inside of the lids are so pretty! These are a must have if you own Sizzix dies!! I hope that you enjoyed the tour of my fun time at Convention. If you'd like to join me at Convention next year in July, I'd love to have you on my team! Send me an email so I can get you some more information. Stampin' Hugs! Kristi
Subscribe to:
Posts (Atom)