Saturday, July 30, 2011

FUN IN THE FLOWERS AT 2011 STAMPIN UP CONVENTION!

Me and my Stitchedstamper buddies are playing in the flower props at the Salt Palace Convention Center where the 2011 Stampin' Up Convention was. The theme this year was "Grow."

Sue Stratton (bottom left), Sally Hadley (Top Left), Kristi Kelly (Top right), Loni Spendlove (Bottom Right)


Loni Spendlove, Sally Hadley, Sue Stratton, Kristi Kelly

2011 STAMPIN UP! CONVENTION PHOTOS

I'm always amazed each year at Convention at how many neat ideas I come home with. I thought this idea shown by Carrie Cudney was so cute:

BONUS TIP.. use the little extra pieces from the Blossom Bouquet punch for the candle FLAMES!

make the cake stand out of punches.

STAMPIN' UP! SUPPLIES USED:

  • Nursery Nest DSP, #122347, pg 186
  • Wisteria Wonder, Lucky Limeade & Blushing Bride Cardstock
  • Lace Ribbon Border punch, #122362, pg 211
  • Extra Large Oval punch, #119859, pg 212
  • Very Vanilla Seam Binding ribbon, #120999, pg 195
  • Lucky LImeade Ruffled Ribbon, #122977, pg 194
  • Blossom bouquet punch, #122464, pg 211
You can order online at www.stampinwithkristi.stampinup.net or call me at 702-544-3936

 Kristi Kelly


Friday, July 22, 2011

JULY'S TECHNIQUE STAMP GROUP PROJECTS

This month at Stamp Group I taught the ladies how to do the Heated Ribbon Technique. It's so cool to watch the ribbon shrink to the design that you want just by putting the heat tool next to the ribbon. I used all products from SU, Sticky Sheet cut from the 2nd largest size circle on the Circle #2 Big Shot die. I used about a 19" piece of the Old Olive Satin Ribbon cut at 1" intervals, about 1/8" in all the way down the length of the ribbon. Take off one side of the Sticky Sheet and start pleating the ribbon all the way around until you get to the middle. Heat the ribbon up until it looks like you want it. Cut the same size circle of C/S to match the ribbon. Put that on the back side of the sticky strip after pulling off the white backing of the sticky strip. Put a pearl or something in the middle of the ribbon flower and you're done. The DSP is Beyond the Garden. The embossing folder is Flower Garden. The flowers were colored with Pastels. Everything was sponged with Early Espresso Ink.

This next card was CASE'D from My Creative Corner. I made a few small changes to it to make it mine. The flower was embossed with Winter White embossing powder on Pretty in Pink c/s & Certainly Celery for the leaves. The flower was popped up with Dimensionals. The color didn't come out very well. The DSP was Pink Pirouette polka Dots & the background white mat was ran thorough the Dotted Swiss Embossing Folder.
If you live in Las Vegas and you want to join my Technique stamp group email me at Kristi Kelly kellyklan@cox.net

Tuesday, June 14, 2011

Tuesday, May 17, 2011

May Nautical Card Stamp Camp

You're invited to come to my Nautical Card Camp!

Date:  Saturday, May 28th
Time:  10 a.m.- 1 p.m.
Place:  Kristi Kelly's House (email me for my address krystalpurple@gmail.com)
Cost:  $8 Please pay when you sign up via check or cash

R.S.V.P by Monday, May 23rd

You will be making two of each of the three cards shown below. If you're like me I always want to keep one, but I like to give one away. This is your opportunity to do just that if you wish. You will also receive envelopes for each card.  Two of the cards are 5 1/2" x 4 1/4", the other card is a cute 3"x 3" card which is great to put on a gift box or bag.


These cards will feature new items from the SU Summer Mini Catalog. I just love the new products that we will be using. Come play with the new clear mount stamp sets, The Open Sea, & Sail Boat. You'll love the new Baker's twine in Espresso & white, & Cherry & White that we'll be using on the cards. You'll get to see the new Nautical Expedition Designer Paper & put some on your cards. It is fabulous paper! We'll be doing a little water coloring with aqua pens. There will be cutting, tearing, sponging, sanding, heat embossing, etc.  We'll also be using the new Postage Stamp Punch. If you want to learn a lot of techniques at one class you won't want to miss this one!

To sign up you can email me or post a comment to this blog that you would like to sign up.

Thanks and hope to see you soon,

Kristi Kelly
Stampin' Up Demo

Monday, May 16, 2011

MAY TECHNIQUE STAMP GROUP PROJECTS


This is the first card that we made. I used the Swirly Texturz Template for the Big Shot along with the Texturz Silicone Rubber, & Impressions Pad onto River Rock Card stock. I sponged lightly with Soft Suede ink over the top of the swirly texture. Next I used Early Espresso Card stock and Soft Suede as the card base. The Early Espresso Corners were punched using the Photo Corners XL Punch. The Petals were punched using the new Blossoms Petal Punch. I stamped them with Pink Pirouette ink then sponged the edges with Melon Mambo. The leaves are from the same punch using Soft Suede and sponged with Early Espresso. The steams are hand cut. The pink 1/4" grosgrain is put only on the front part of the bottom of the card stock and the 3 smaller pieces are tied underneath the main ribbon. The silver brads are put on the end through the card.
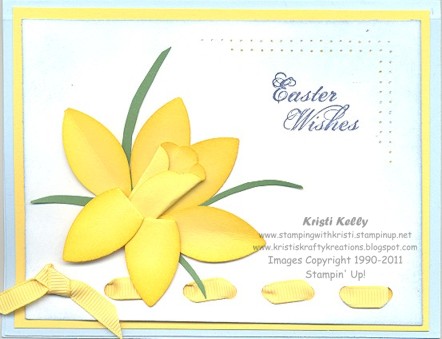
This was the next card that we made. I taught the ladies in the group how to make the Daffodil flower. I did a 6x6 Technique card for it with all the directions on the card & a picture of the card. I used the Blossom Petal Flower Punch. I punched 6 Daffodil Delight leaves & one Big flower petal. I sponged them all with Daffodil Delight Ink on the tips. I used  my bone folder to curl up the edges of the flowers and round the circle. I put glue dots on the back of each to adhere the petals & the Big Blossom Petal.The steams were hand cut out of Garden Green Card stock & tucked them in behind the flower. I used the Mat Pack & my Paper Piecer to make the holes above the Easter Wishes. The greeting came from All Holidays stamp set.The card stock I used was Whisper White, Daffodil Delight, & Bashful Blue. I used the 3/16th hole punch on the Crop-A-Dile to make the holes on the bottom of the card. I stitched Daffodil ribbon in & out of the holes. In the last hole I put a smaller piece of ribbon and tied a knot with the tail of the opposite ribbon. These cards look so much better in person.

If you're interested in joining my Technique Stamp Group, email me and we can get you started!

MARCH 2011 Technique Stamp Group

We did this beautiful Cali Lily card during Stamp Group in March.  I used the Blossom Petal Punch. Punch one big petal & two long leaves from Whisper White card stock. Punch two long leaves out of Wild Wasabi & two stems by hand. The stamens are cut by hand out of Daffodil card stock & sponged with Daffodil ink. The flower leaves are sponged lightly with Sahara Sand & also in the middle behind the stamen. The bottom of the flower is sponged with Wild Wasabi just a little bit. Stamp the greeting from the Easter Blossoms Stamp Set, punch out with the Large Oval Punch. Punch the Daffodil card stock with the Decorative Label punch and the Espresso card stock with the Modern Label punch. Put it together and pop it up if you like.


I apologize for the poor picture. This one used the new Embossing Texture folder, Framed Tulips. I love it! I also used the Big Shot to do the scalloped heart. I embossed it and punched it out. I did marker to the stamp set Punch Potpourri (Level 1 Hostess set) for the heart on top of the scalloped heart. The leaves are from the Bird Punch. The rest is pretty self explanatory.
Hope you like these cards!
Kristi